

How to Assemble a Bunk Bed: A Step-by-Step Guide
Posted by Posted by Just Bunk Beds on Aug 27th 2026
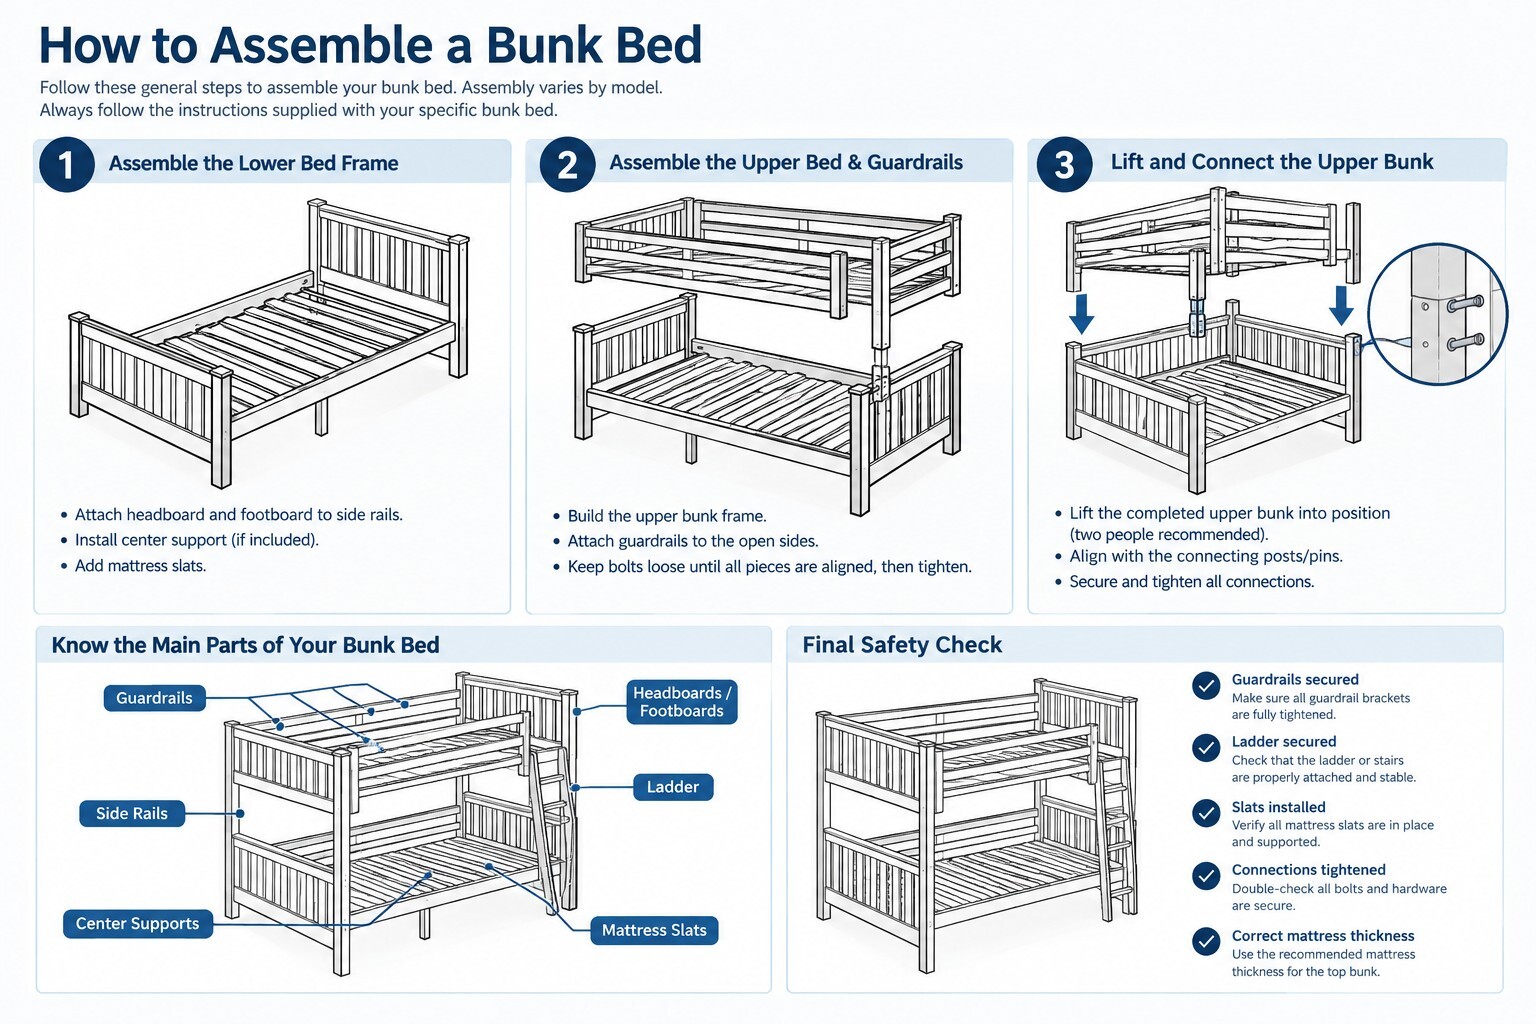
Putting together a bunk bed may look complicated when you first open the boxes, but the job becomes much easier when you organize the parts, follow the manufacturer's instructions, and work through the assembly in the proper order.
If you are wondering how to put bunk beds together, the most important thing to remember is that bunk beds are not all assembled the same way. Designs, hardware, ladders, guardrails, support systems, and connection methods can vary considerably from one model to another.
The steps below provide a general overview of what to expect when assembling a bunk bed. Always follow the assembly instructions supplied with your specific bunk bed.
Before You Start: Check the Room and the Parts
Before assembling the bed, make sure you have enough open space to work safely around the frame.
Whenever possible, assemble the bunk bed in the room where it will be used. Large headboards, footboards, staircases, and partially assembled bed sections can be difficult to move through doorways, hallways, and staircases afterward.
Next, unpack the cartons and organize the components. Check the parts and hardware against the manufacturer's assembly instructions before you begin.
Look for:
- Headboards and footboards or bed ends
- Side rails
- Mattress support slats or slat systems
- Center support rails or beams, if included
- Guardrails
- Ladder or staircase components
- Connecting pins, brackets, bolts, screws, and other hardware
- Any optional trundle, drawers, or storage components
If something appears to be missing or damaged, stop and identify the correct replacement part rather than substituting hardware or modifying the bed.
This is especially important with an adult bunk bed, where the structural components and hardware are designed to work together as a complete support system.
Read the Assembly Instructions Before Picking Up a Tool
It is tempting to start assembling the obvious pieces immediately. Spending a few minutes reading through the complete instructions first can save considerably more time later.
Pay particular attention to the orientation of the bed ends, side rails, guardrails, ladder and any hardware that must face a particular direction.
This becomes even more important if the bunk bed has optional configurations such as a ladder that can be installed on either side, different lower-bed height settings, storage stairs, drawers or a trundle.
Do not assume that two similar-looking pieces are interchangeable.
Step 1: Assemble or Position the Bed Ends
Depending on the bunk bed, the headboards and footboards may arrive fully assembled, partially assembled or completely unassembled.
If assembly is required, follow the manufacturer's diagram carefully and pay attention to which components belong to the upper and lower beds.
For models with preassembled headboards or footboards, position them in the room according to the final orientation of the bunk bed before attaching the side rails.
Whenever possible, assemble the bunk bed in the location where it will remain. A fully assembled bunk bed can be extremely heavy and difficult to reposition, particularly with larger Full, Full XL and Queen bunk beds. Lifting, dragging or repeatedly moving an assembled bunk bed can also place unnecessary stress on the frame connections and hardware.
Take a few minutes before assembly to confirm the bed's position, ladder access and surrounding clearance. If the bunk bed must be moved later, check all structural connections and hardware again before use.
Step 2: Connect the Side Rails
Attach the side rails to the appropriate headboards and footboards using the hardware supplied with the bed.
Start the connections before completely tightening the frame unless the manufacturer's instructions specify otherwise. Keeping the connections slightly loose at first can make it easier to align the remaining components.
Once the frame is properly positioned and square, tighten the connections according to the assembly instructions.
Never substitute your own bolts, screws or brackets for structural hardware supplied or specified by the manufacturer.
Step 3: Install Center Supports and Mattress Slats
Many bunk beds use a combination of side rails, center supports and mattress slats to support the mattress.
Install every required support component.
If your bunk bed includes center support rails or beams, they are part of the bed's structural design and should not be omitted. Install the mattress slats in the locations shown in the assembly instructions and secure them when required.
Do not place the mattresses on the bunk bed until the complete support system has been installed.
Step 4: Connect the Upper and Lower Bunks
Some bunk beds are assembled as separate upper and lower beds and then stacked. Others are constructed as a single integrated frame.
For stackable models, the upper bunk is typically positioned over the lower bunk using manufacturer-supplied connecting pins or another connection system.
This is one of the stages where having two adults is especially helpful.
Do not attempt to lift or position a large upper bed section by yourself. Keep hands and fingers away from connection points while the upper bunk is being lowered into position.
Once the bunks are connected, verify that the upper bed is properly seated and secured according to the manufacturer's instructions.
Step 5: Install the Upper Guardrails
Guardrails are an essential part of the upper bunk and must be installed exactly as designed.
Attach all required guardrail components and check each connection carefully. Do not remove a guardrail because it makes accessing the bed easier or because one side of the bunk bed will be positioned against a wall.
Also remember that mattress thickness affects the usable height of the guardrail. Always follow the mattress thickness requirements for your particular bunk bed.
The same principle applies when assembling loft beds for adults: the guardrails, mattress support system and structural connections should all be installed exactly as specified.
Step 6: Install the Ladder or Storage Stairs
Once the main bunk bed frame is assembled, install the ladder or storage staircase according to the instructions for your model.
Bunk bed access systems vary. A ladder may be:
- Vertical
- Slanted
- Attached to the side rails
- Integrated into the headboard or footboard
- Hooked onto the bed frame
Storage staircases may require additional assembly and attachment to the main bunk bed.
Make sure the ladder or stairs are installed in the correct location and that all required hooks, bolts, brackets or attachment points are secure.
If you are assembling one of our Twin XL bunk beds for adults, don't assume the ladder configuration is the same as a standard Twin bunk bed. Follow the instructions supplied with the particular model.
Step 7: Assemble Optional Trundles, Drawers or Storage
If your bunk bed includes a trundle, storage drawers or another under-bed option, assemble the main bunk bed first. Set the trundle or drawer boxes aside until the bunk bed frame is completely assembled, positioned and secure.
Once the main bed is finished, assemble the trundle or drawers and slide them into place. Trying to work on the under-bed components first can create unnecessary clutter and make the main bunk bed assembly more difficult.
Before inserting a trundle or drawers, check that the bunk bed is positioned far enough from walls and surrounding furniture for the component to open completely.
Our Bunk Bed Space & Clearance Guide can help you plan for ladder access, walking space and the additional floor area required when a trundle is pulled out.
How to Put a Loft Bed Together
Assembling a loft bed follows many of the same principles as assembling a bunk bed, although there is no traditional lower bunk.
Start by identifying and positioning the bed ends, then install the side rails, mattress support system, guardrails and ladder or staircase in the sequence specified by the manufacturer.
Because loft-bed designs vary considerably, use the assembly instructions for your exact model rather than assuming the procedure will be identical to a bunk bed you have assembled before.
Final Bunk Bed Safety Check
Before placing the mattresses on the bed and allowing anyone to use it, inspect the entire bunk bed.
Check that:
- All structural hardware is installed
- Bolts and connections are properly tightened
- Upper and lower bed sections are securely connected
- Center supports are installed where required
- Mattress slats are properly positioned and secured
- Upper guardrails are securely attached
- The ladder or stairs are properly installed
- Optional drawers or trundles operate without interfering with the bunk bed
- The bunk bed is stable and does not have unexpected movement
Once the mattress is installed, verify that its thickness complies with the manufacturer's requirements, particularly on the upper bunk.
For more information, see our Bunk Bed Safety Guide.
Don't Improvise When Something Doesn't Fit
If a rail, bracket, bolt or other structural component does not line up correctly, don't force it.
First, go back through the instructions and confirm that the component is facing the correct direction and is being installed in the proper location. A reversed rail or bed end can sometimes make the next assembly step appear impossible.
If a part is missing, damaged or does not appear to fit correctly, contact Just Bunk Beds with your order information and, when helpful, photos of the component.
This is safer than drilling new holes, substituting hardware or modifying a structural part of the bed.
Whether you are assembling one of our Full bunk beds for adults or Twin over Full bunk beds for adults, the assembly instructions supplied with the specific model should always be your primary reference.
FAQs About Bunk Bed Assembly
How long does it take to assemble a bunk bed?
Assembly time varies considerably by bunk bed design. A straightforward ladder-style bunk bed will generally take less time than a larger model with storage stairs, drawers or a trundle.
Rather than planning around a specific number of hours, give yourself enough uninterrupted time to unpack the bed, identify the components and complete the assembly without rushing.
Do you need two people to assemble a bunk bed?
Having two adults is strongly recommended, particularly when positioning large headboards and footboards or lifting an upper bunk section onto the lower bed.
Larger Full, Full XL and Queen bunk beds can have substantial components that should not be lifted or positioned by one person.
What tools are needed to assemble a bunk bed?
The required tools depend on the model. Check the assembly instructions before starting, since they will identify the tools needed and indicate which assembly hardware is included with the bed.
Avoid using power tools unless they are specifically appropriate for the hardware and assembly instructions. Overtightening a fastener can damage wood components or hardware.
Should I assemble the bunk bed in the room where it will be used?
Yes, whenever practical. A fully or partially assembled bunk bed can be difficult or impossible to move through standard doorways, hallways or staircases.
This is particularly important for larger bunk beds with Full, Full XL or Queen sleeping surfaces, oversized bed ends or storage staircases.
Is assembling a loft bed different from assembling a bunk bed?
The basic principles are similar, but the actual assembly sequence depends on the loft-bed design. Follow the instructions supplied with your particular loft bed rather than using general bunk-bed instructions as a substitute.
What should I do if a bunk bed part is missing or damaged?
Stop assembly and identify the missing or damaged component. If you purchased the bunk bed from Just Bunk Beds, contact us with your order information so we can help identify the correct part.
Do not substitute structural hardware, drill new mounting holes or modify the bunk bed in an attempt to make an incorrect part fit.
Moving or storing your bunk bed? See our guide on How to Disassemble a Bunk Bed for Moving or Storage.